Introduction
Welcome to the fourth and final part to this blog series! In this part, we are going to wrap up pyATS and Genie by looking at some more useful modules within each of these libraries and take a quick look at an open-source web user-interface (UI) for running our pyATS testcases, because who doesn’t like a nice UI?! I don’t want to take up any more time in this intro, so let’s dive in!
Useful Modules
In the first three parts of this series, I went over the main functionality and key features of both pyATS and Genie. In this post, I want to focus on the “other” modules that are included, but not always talked about. To be more specific, we will be going over the pyATS Clean, Blitz, and Health Check modules. Don’t get me wrong – there are plenty of other features/topics that I would love to cover (Robot Framework, Metaparsers, CLI Auto-Parser, etc.) , but I wanted to focus on the modules that I felt would provide the most value to you.
pyATS Clean
The pyATS Clean framework allows you to initialize a device and bring it up with a specific configuration, OS version, etc. Beyond initializing a device, Clean also allows you to remove unwanted configuration from a device and return it back to an operational state. This can be helpful when a device is acting up and you aren’t sure what’s going on with it. Instead of parsing through the configuration or checking the operational state via show commands, you can wipe it clean and start over with a given base configuration. Remember, it’s not giving up if you get the device back to an operational state in a shorter amount of time. There are always [should be ![]() ] logs for any post-mortem discussions.
] logs for any post-mortem discussions.
Cleaning a device
So we know what pyATS Clean is, but how do we actually use it? Lucky for us, the pyATS devs made it super easy and we able to use a YAML file to declare our “cleaning”. One important note is that pyATS Clean YAML files are broken down into Clean Stages. These different stages are specific to OS and Platform types (i.e. OS: iosxe, platform: cat9k). There are some stages that are common to all supported OS types (labeled as ‘COM’ in the docs), but there are some that are OS-specific. For example, as of the 21.7 release, we only have 5 Clean Stages available for Cat 9k IOS-XE devices. I wanted to include that they are only for Cat 9k devices because, remember, it’s specific to the OS AND Platform type. Here’s a list of the supported OS/Platform types and the available Clean Stages for Cat 9k IOS-XE devices (as of v21.7):

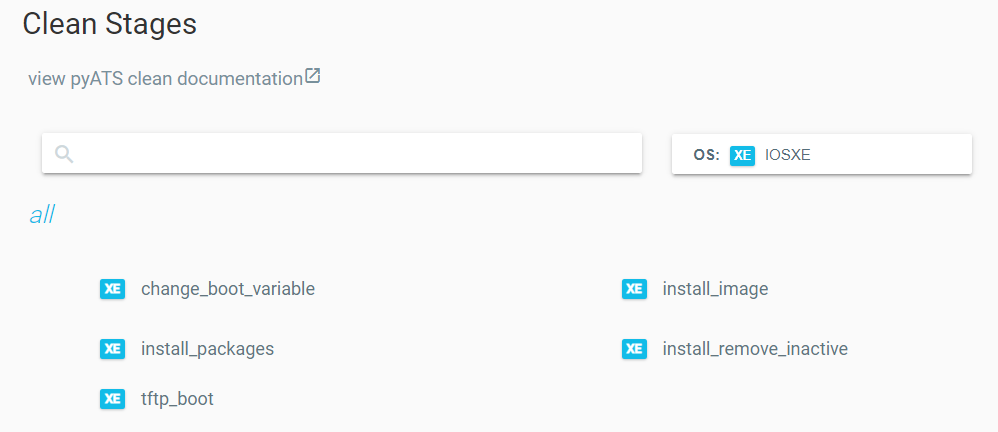
You can see that, as of now (v21.7), there aren’t many supported OS and Platform types. However, the best part of open-source is that anyone can contribute and help fill the voids! I do find that, even though there aren’t that many Clean Stages for IOS-XE devices, the ones that are available cover most use cases when initializing a device. Here’s a small example of a Clean YAML file from the pyATS docs:
cleaners:
    PyatsDeviceClean:
        module: genie.libs.clean
        devices: [PE1]

devices:
    PE1:

        images:
        - /path/to/image.bin

        connect:

        copy_to_linux:
            destination:
                directory: /tftp-server
                hostname: 127.0.0.1
            unique_number: 12345

        copy_to_device:
            origin:
                hostname: 127.0.0.1
            destination:
                directory: 'bootflash:'

        change_boot_variable:

        reload:

        verify_running_image:

        order:
        - connect
        - copy_to_linux
        - copy_to_device
        - change_boot_variable
        - reload
        - verify_running_image
As you can see, the YAML file is very readable. It doesn’t take a software developer to understand what’s going on here. The easiest way to understand what’s going on is by looking at the list under the order key. The order key must always be defined so that assumptions can not be made during execution. At a high-level, we are performing the following steps:
- Transfer IOS image (.bin file) from the local machine to a Linux TFTP server (in this case, it’s a directory on the local machine)
- Copy the IOS image from the TFTP server to the network device
- Set the boot variables (defaults to 0x2102)
- Reload the device
- Verify the new image is the running image
For all sections that have a stage defined with no values after the colon, they are assuming the default values for each argument. To view the default arguments for each stage, check out the Clean Stages documentation here.
Power Cyclers
Before we jump to the next section, I wanted to mention a small (but very powerful!) feature included with Clean. Besides cleaning network devices, there is also a list of supported “Power Cyclers”. Power Cyclers are essentially your common OOB, PDU, and UPS devices. Currently, Raritan, APC, Dualcomm, Cyberswitching, and ESXi (for VMs) are supported. I believe this feature shows the amount of detail the pyATS team takes into account when developing modules for this library. Beyond just rolling back the configuration, you can add additional instructions to reboot a device if it gets stuck in a hung state. This is HUGE! You can think of this as your programmatic upgrade from the ‘reload in X’ command in IOS. It’s a major upgrade due to its adaptability and only activating if it detects a device being unresponsive. If you’d like to add these Power Cycler devices to your testbed and Clean YAML file, check out the docs here.
Alright, well now that we’ve covered pyATS Clean, let’s take a look at Blitz!
pyATS Blitz
I like to relate Blitz to an Ansible Playbook. Blitz provides you the ability to create pyATS testscripts with minimal programming experience. Like Ansible Playbooks, Blitz is written as a YAML file. Within the Blitz YAML file, you can perform all the same actions you can perform in pyATS/Genie Python code:
- Configure a device
- Parse output
- Learn a device ‘feature’
- Use device APIs
- etc…
The best part about Blitz is that it lowers the barrier to entry, so you can share these YAML files with the other members of your team that may despise programming. Here’s a quick example of a Blitz file from the pyATS docs:
# Name of the testcase
TestBgpShutdown:
    # Location of the blitz trigger - always this same location for all blitz trigger
    source:
      pkg: genie.libs.sdk
      class: triggers.blitz.blitz.Blitz

    # Devices to run on - Default is uut
    devices: ['uut']

    # Field containing all the Testcase sections
    test_sections:

      # Section name - Can be any name, it will show as the first section of
      # the testcase
        - apply_configuration:
            # List of actions
            - configure:
                device: R3_nx
                command: |
                  router bgp 65000
                  shutdown
            - sleep:
                sleep_time: 5

        # Second section name
        - verify_configuration:
            # Action #1
            # Send show command to the device and verify if part
            # of a string is in the output or not
            - execute:
                device: R3_nx
                command: show bgp process vrf all
                include:
                    # Verify Shutdown is within the show run output
                  - 'Shutdown'
                exclude:
                    # Verify Running is not within the show run output
                  - 'Running'
            # Action #2
            # Send show command and use our available parsers to make sure
            # the bgp protocol state is shutdown
            - parse:
                device: R3_nx
                # All action supports banner field to add to the log
                banner: Verify bgp process is shutdown
                command: show bgp process vrf all
                include:
                  - get_values('shutdown')
                exclude:
                  - not_contains('running')
        - Revert_configuration:
            # Configure action, which accepts command as an argument
            - configure:
                device: R3_nx
                banner: Un-Shutting down bgp 65000
                command: |
                  router bgp 65000
                  no shutdown
        - verify_revert:
            # Send show command and verify if part of a string is in the output or not
            - execute:
                device: R3_nx
                command: show bgp process vrf all
                include:
                    # Verify Running is within the show run output
                    - 'Running'
                exclude:
                    # Verify Shutdown is not within the show run output
                    - 'Shutdown'
            # Send show command and use our available parsers to make sure
            # it is the bgp protocol state which is running
            - parse:
                device: R3_nx
                command: show bgp process vrf all
Much of the code is commented and self-descriptive, but essentially the testcase is performing a ‘shut’ and ‘no shut’ to the BGP process on the device, with specific BGP verification commands built-in to the script. This may seem like a pointless use case, but it’s a good example of the different actions used to complete the testcase. In the example, you see keys such as: configure, execute, sleep, and parse. All of these are considered Blitz actions. You can find the list of available Blitz actions here. These actions have a direct correlation with the methods we’ve used when writing Python scripts with pyATS/Genie in previous parts of this blog series.
There are many more details surrounding Blitz such as saving output, assigning variables, replying to prompt dialogue, and much more. However, I need to stay the course and provide high-level overviews of these features and why you would want to experiment with them. It’s up to you to dive deeper into the documentation and figure out whether it fits your use case. I’ll have links to all the different features mentioned at the end of this post. Now that we’ve covered Blitz, let’s take a look at a feature that builds on Blitz and is what I consider the nurse of testscripts: pyATS Health Check.
pyATS Health Check
I call this the nurse of pyATS testscripts because it helps keep a close eye on the one thing we care about most: our test device(s). The Health Check feature collects and monitors the state of our test device(s) before and after each test section. There’s also an option to have it continuously monitor our device(s) throughout the entire testscript by using a background process. It can collect metrics such as CPU/memory health, tracebacks, core dumps, and logs. This may sound like, “Oh great, another way to monitor our devices…”. Yes and no… Yes, it monitors your devices while testing is occurring, but more importantly, it will collect all the appropriate data for you automatically (if configured properly) in case of device failure. I don’t know about you, but I’ve been in situations where I wish I could have collected the logs or core dump for TAC before a router or switch rebooted itself. How many hours/days of troubleshooting could that have saved if we would have just had the logs/dumps to tell us what went wrong? Here’s another example from the pyATS docs of how you would write a Health Check in YAML:
pyats_health_processors:
  source:
    pkg: genie.libs.health
    class: health.Health
  test_sections:
    - cpu:
        - api:
            device: ASR1K-1 # <<< changed from `uut`
            function: health_cpu
            arguments:
              processes: ['BGP.*']
            include:
              - sum_value_operator('value', '<', 90)
    - memory:
        - api:
            device: ASR1K-1 # <<< changed from `uut`
            function: health_memory
            arguments:
              processes: ['BGP.*', 'OSPF.*']
            include:
              - sum_value_operator('value', '<', 90)
I love using the YAML format instead of the pyATS CLI commands because it’s much easier to read. Taking a look at the above example, this health check runs after every testcase/section. It looks at the BGP-specific processes running on the CPU and in memory. If the BGP CPU processes exceed 90%, the health check will report a failure. In addition to the BGP processes, the memory check also looks for OSPF-specific processes. If the sum of the the BGP and OSPF processes exceeds 90% memory utilization, a health check failure will be reported. I think this is a very underrated feature and is often taken for granted, until there is a failure on the device.
Wow, can you believe all the features we just reviewed are included in the pyATS library? I think this shows the depth of pyATS and how it’s starting to feel more like a platform rather than just a library, but I digress… Now, let’s shift our attention to a project that I’ve been excited about for a couple years: XPRESSO.
Everyone wants a GUI
Up to this point, we’ve mostly looked at pyATS and Genie as command-line tools and libraries that we’ve imported into our Python scripts. What if we could build and run testscripts using a web UI? How many more engineers could we attract to this great tool if we provided a web dashboard that they could interact with? Meet XPRESSO…
I first heard about XPRESSO at Cisco Live US 2019 in San Diego, CA, where I attended a session about pyATS. XPRESSO was brought up towards the end of the presentation and described as a tool that Cisco has been using internally for quite awhile, and that the pyATS team was making progress towards releasing it to the public soon. Fast-forward to the end of 2020, the pyATS team released XPRESSO to the public.
XPRESSO is web dashboard that provides central management for creating jobs, job schedules, reserving resources, testbed queueing, test result comparisons, verification testing, and baselining test results. Those are some the main features highlighted on their launch page on DevNet.
I don’t want to go into the details of setting up XPRESSO, but you have a couple options to set it up and begin testing it out on your own:
- Building it yourself (via Docker)
- DevNet Sandbox
Setting up XPRESSO on your own
The pyATS team has provided good documentation around the requirements for XPRESSO and how to set it up using Docker. At a high-level, it’s recommended to have 16-core CPU, 64GB RAM, and at least 50GB of storage. I will say, I’ve gotten XPRESSO up and running on my home PC, which has a 4-core CPU and 16GB of RAM, but it’s VERYYYY slow. I would not recommend it. On top of that, I was limited to the tasks I could perform before things stopped working. I’ve read others succeed with half of the recommended requirements (8-core CPU and 32GB RAM), but don’t get frustrated if things go wrong. I’ll include links to the XPRESSO documentation at the end of this post. Needless to say, I would recommend going with the second option if you just want to take XPRESSO for a test drive.
Using the XPRESSO DevNet sandbox
The DevNet sandboxes are the first place I look when I want to try out a new Cisco technology or platform. If you’re like me, it’s always exciting when you get a chance to play with the newest tech, but it can be a pain to setup. Many times, I call it a day after fighting for hours getting everything set up. To avoid that, I look to the sandboxes. For XPRESSO, I would highly recommend using the sandbox so that you avoid any setup headaches and focus on your main goal: experimenting with XPRESSO. The XPRESSO sandbox requires you to reserve it before gaining access. Currently, there is not an ‘always-on’ instance. Normally, you can reserve it on the spot. In order to reserve it, go to the DevNet Networking Sandboxes here and login to your account. Once logged in, search for ‘xpresso’. Here’s what you should see after you search:

Once you click ‘Reserve’, it will provide you available reservation times. Like I mentioned before, most of the time, you should be able to reserve ASAP and have the sandbox for 8 hours. However, I urge you to adjust the reservation time if you don’t plan on using it for the entire duration. These resources are held up until your reservation time expires. If you’re unsure how long you’ll need it, reserve it for the 8 hours, but remember to manually end the lab before you sign-off. This will prompt the lab to be tore down and free up its resources. Your fellow network engineers thank you!
Conclusion
We have reached the end of the pyATS and Genie series. I’ve learned a lot while writing this series for you and I hope you learned just as much (or hopefully more)! I hope you’ve been able to find the value and benefits in using these libraries. They definitely have a lot of depth and a learning curve compared to other network automation libraries, but my goal of the series was to lower that barrier to entry and provide you enough detail to decide whether these libraries will meet your network testing needs.
Thanks for reading this series and I hope you stay tuned for future posts! If you have any questions, feedback, or just want to chat, please feel free to hit me up on Twitter (@devnetdan).
References
pyATS Clean: https://pubhub.devnetcloud.com/media/genie-docs/docs/clean/index.html
pyATS Blitz: https://pubhub.devnetcloud.com/media/genie-docs/docs/blitz/index.html
pyATS Health Check: https://pubhub.devnetcloud.com/media/genie-docs/docs/health/index.html
XPRESSO Launch Page: https://developer.cisco.com/docs/xpresso/#!overview
XPRESSO Github: https://github.com/CiscoTestAutomation/xpresso
XPRESSO Requirements: https://developer.cisco.com/docs/xpresso/#!operational-requirements-constraints/operational-requirements-and-constraints
